
SwiftUI has revolutionized iOS development by making UI creation incredibly fast and intuitive. However, this ease of use comes with a hidden trap—it’s equally easy to write unperformant code without realizing it. I’ve seen too many developers create beautiful interfaces that stutter and lag because they missed key performance principles.
Let’s be honest: when you first start with SwiftUI, the magic feels almost too good to be true. You write a few lines of declarative code, and suddenly you have a working interface. But as your apps grow more complex, you might notice that silky-smooth 60fps experience starting to hiccup.
This guide focuses on the why and how of optimizing SwiftUI performance. Rather than throwing generic advice at you, I’ll share practical techniques that I’ve learned from real-world app development—including some mistakes I wish I’d avoided earlier in my career. By understanding SwiftUI’s performance model and sidestepping common pitfalls, you’ll ensure your apps deliver the smooth, responsive experience users expect.
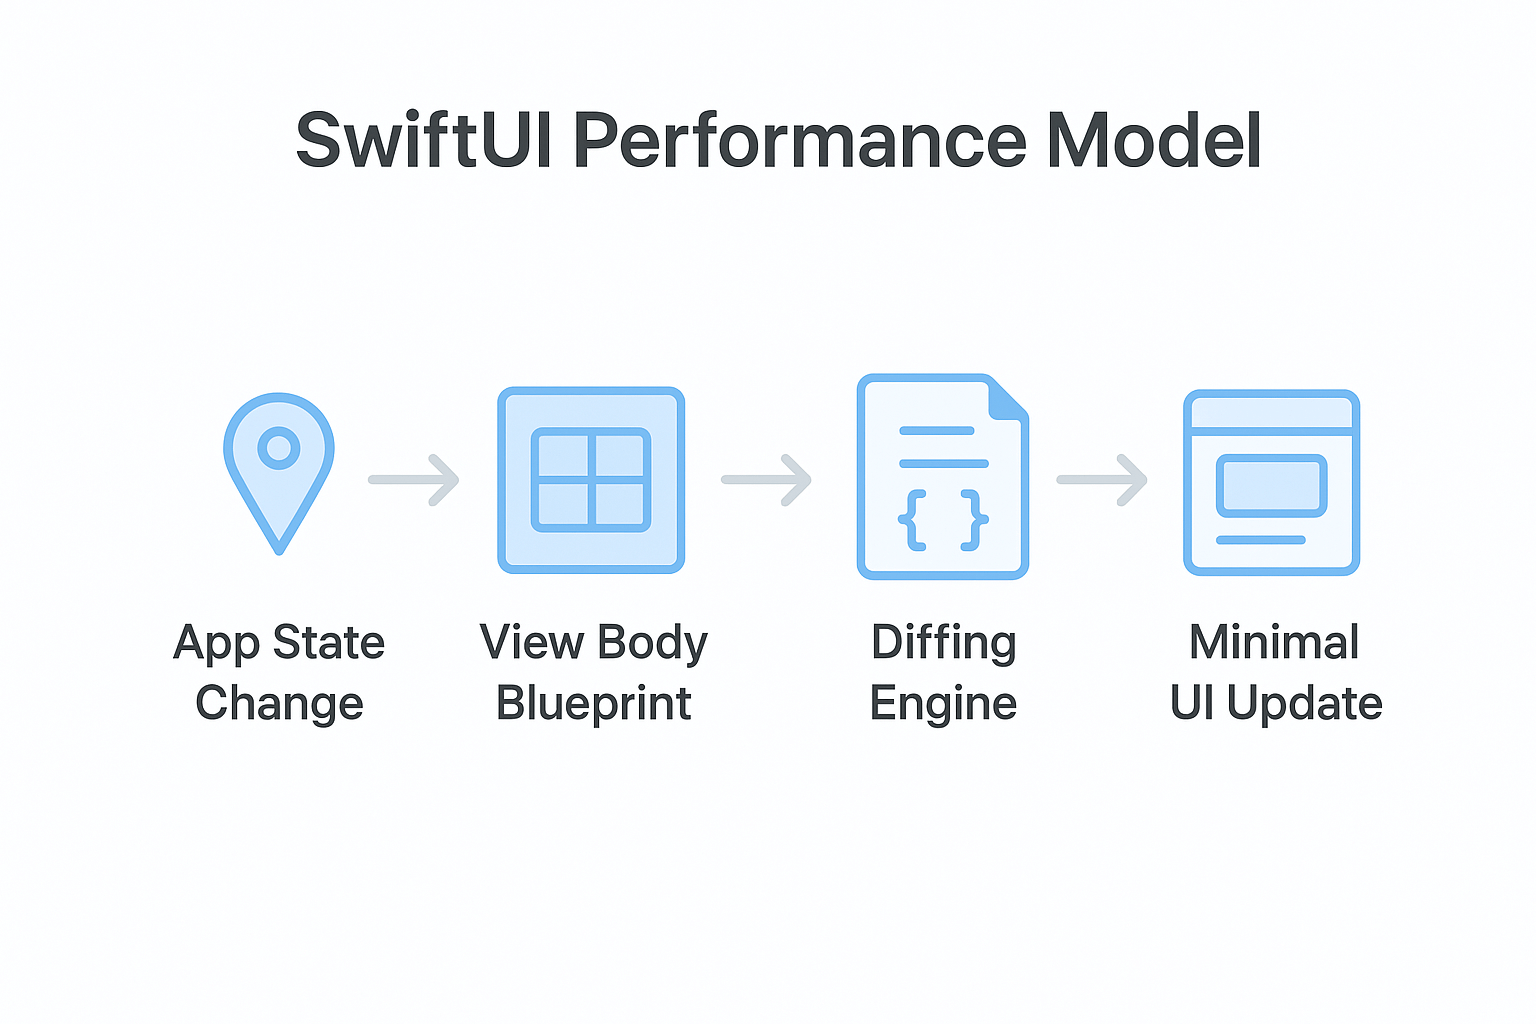
1. Understanding SwiftUI’s Performance Model
Before diving into fixes, let’s understand how SwiftUI actually works under the hood. Many developers assume that frequent body calls are bad—I used to think this too. But that’s not the real issue. SwiftUI is designed to handle frequent view evaluations efficiently. The key is making those evaluations cheap and ensuring the framework can diff your view hierarchy effectively [Ref-1].
The performance model revolves around a simple principle: SwiftUI compares your new view description with the previous one, then updates only what’s changed. This means your focus should be on creating stable, predictable view hierarchies rather than avoiding body calls altogether.
The Truth About View body
Here’s something that surprised me early in my SwiftUI journey: the body property is just a lightweight blueprint. SwiftUI calls it frequently, and that’s completely fine. Think of it as a recipe rather than the actual cooking—describing what you want is fast, but building the UI is where the real work happens.
In the example below, the view uses the @State property wrapper [Ref-2] to manage simple local state:
struct ContentView: View {
    @State private var counter = 0

    var body: some View {
        // This gets called often, but it's just describing the UI
        VStack {
            Text("Counter: \(counter)")
            Button("Increment") {
                counter += 1
            }
        }
        .onAppear {
            Logger.shared.info("Body evaluated") // Use Logger instead of print
        }
    }
}
The real performance impact happens when SwiftUI compares your new view hierarchy to the previous one. If you’re returning dramatically different structures each time, that’s when you’ll see slowdowns. Keep your view descriptions consistent and let SwiftUI handle the optimization.
State, Identity, and Dependencies
SwiftUI’s reactivity system is surprisingly intelligent. A view only re-evaluates when one of its direct dependencies changes—not when unrelated state elsewhere in your app updates. The secret is keeping these dependencies specific and minimal.
Consider this scenario: you have a user profile view that displays name, email, and avatar. If you pass the entire User object as an @ObservedObject [Ref-3], any change to any property will trigger a re-render. Instead, pass only the specific properties this view actually needs.
// ❌ Over-broad dependency
struct ProfileHeaderView: View {
    @ObservedObject var user: User

    var body: some View {
        // This re-renders when ANY User property changes
        HStack {
            AsyncImage(url: user.avatarURL)
            Text(user.name)
        }
    }
}

// ✅ Specific dependencies
struct ProfileHeaderView: View {
    let name: String
    let avatarURL: URL?

    var body: some View {
        // Only re-renders when name or avatarURL actually change
        HStack {
            AsyncImage(url: avatarURL)
            Text(name)
        }
    }
}
This approach follows the dependency inversion principle from SOLID [Ref-4]—your view depends on abstractions (specific properties) rather than concrete implementations (the entire User object). It’s a simple change that can have huge performance benefits.
2. Key SwiftUI Performance Killers (And How to Fix Them)
Let’s tackle the most common performance issues I encounter in real projects. These aren’t theoretical problems—they’re patterns I see repeatedly that can turn a smooth app into a frustrating experience.
Pitfall 1: Expensive Logic Inside body
This is the biggest performance killer I see in SwiftUI apps. Developers often perform heavy computations like filtering arrays or complex calculations directly within the body property. Remember, body gets called frequently, so expensive operations run repeatedly—even when the underlying data hasn’t changed.
Here’s a common pattern that destroys performance:
// ❌ Expensive filtering on every render
struct ProductListView: View {
    @State private var products: [Product] = []
    @State private var searchText: String = ""

    var body: some View {
        List {
            // This filters the entire array on EVERY body call
            ForEach(products.filter { product in // [Ref-5]
                searchText.isEmpty || product.name.localizedCaseInsensitiveContains(searchText)
            }) { product in
                ProductRowView(product: product)
            }
        }
        .searchable(text: $searchText)
    }
}
If you’ve ever wondered why your search feels sluggish, this is probably the culprit. Every keystroke triggers a complete re-evaluation, and that filter runs on the entire product array.
The fix is moving this logic to a view model or a dedicated method that only recalculates when the source data actually changes:
// ✅ Efficient filtering only when needed
struct ProductListView: View {
    @State private var products: [Product] = []
    @State private var searchText: String = ""
    @State private var filteredProducts: [Product] = []

    var body: some View {
        List {
            ForEach(filteredProducts) { product in
                ProductRowView(product: product)
            }
        }
        .searchable(text: $searchText)
        .onChange(of: searchText) { _, _ in
            updateFilteredProducts()
        }
        .onAppear {
            updateFilteredProducts()
        }
    }

    private func updateFilteredProducts() {
        if searchText.isEmpty {
            filteredProducts = products
        } else {
            filteredProducts = products.filter { $0.name.localizedCaseInsensitiveContains(searchText) }
        }
    }
}
This pattern ensures filtering only happens when the search text or products array actually changes, not on every render cycle. The difference in responsiveness is night and day.
Pitfall 2: Unstable View Identity in ForEach
SwiftUI’s diffing algorithm relies on stable identities to efficiently update lists. When you use unstable identifiers—like array indices—SwiftUI can’t determine which views correspond to which data items. This forces the framework to tear down and recreate views instead of smoothly animating changes.
// ❌ Unstable identity using array indices
struct MessageListView: View {
    @State private var messages: [String] = []

    var body: some View {
        List {
            ForEach(0..<messages.count, id: \.self) { index in
                Text(messages[index])
            }
        }
    }
}
When messages are inserted or deleted, SwiftUI can’t track which views correspond to which messages. I learned this the hard way when building a chat interface—message animations looked janky because SwiftUI was recreating views instead of smoothly transitioning them.
The solution is using stable, unique identifiers by conforming your model to the Identifiable protocol [Ref-6]:
// ✅ Stable identity with Identifiable
struct Message: Identifiable {
    let id = UUID()
    let content: String
    let timestamp: Date
}

struct MessageListView: View {
    @State private var messages: [Message] = []

    var body: some View {
        List {
            ForEach(messages) { message in
                Text(message.content)
            }
        }
    }
}
With stable identities, SwiftUI can efficiently animate insertions, deletions, and reordering. This is especially crucial for lists with custom animations or complex cell layouts.
Pitfall 3: Overusing ObservedObject in Complex Views
Large view models with many properties can cause performance issues when used with @ObservedObject. Any change to any property triggers a re-render of the entire view hierarchy that observes it. This violates the single responsibility principle—your view shouldn’t care about state it doesn’t actually use.
I learned this lesson the hard way when building a complex dashboard view. A single user preference change would cause the entire screen to re-render, including charts and lists that had nothing to do with that preference.
// ❌ Monolithic view model
class DashboardViewModel: ObservableObject {
    @Published var userName: String = ""
    @Published var chartData: [ChartPoint] = []
    @Published var recentActivities: [Activity] = []
    @Published var notificationCount: Int = 0
    // ... many more properties
}

struct DashboardView: View {
    @StateObject private var viewModel = DashboardViewModel()

    var body: some View {
        VStack {
            UserHeaderView(name: viewModel.userName) // ❌ Re-renders when chartData changes
            ChartView(data: viewModel.chartData)     // ❌ Re-renders when userName changes
            ActivityListView(activities: viewModel.recentActivities)
        }
    }
}
The solution is breaking down complex views and using focused state management:
// ✅ Focused, single-responsibility components
struct DashboardView: View {
    var body: some View {
        VStack {
            UserHeaderView()
            ChartView()
            ActivityListView()
        }
    }
}

struct UserHeaderView: View {
    @StateObject private var viewModel = UserHeaderViewModel()

    var body: some View {
        HStack {
            Text("Welcome, \(viewModel.userName)")
            // Only re-renders when userName changes
        }
    }
}
This approach ensures each view only observes the state it actually needs, dramatically reducing unnecessary re-renders. It’s more code upfront, but the performance benefits are worth it.
3. Advanced Tools for Optimizing SwiftUI Performance
Once you’ve mastered the fundamentals, these advanced techniques can help you achieve even smoother performance, especially in complex UIs with large datasets or intensive computations.
The Power of LazyVStack and LazyHStack
Regular VStack and HStack containers create all their child views immediately, even if they’re not visible. For small, static layouts, this is fine. But when dealing with large lists or dynamic content, this upfront cost can cause noticeable lag during initial renders.
Lazy containers like LazyVStack [Ref-7] solve this by creating views only as they scroll into the visible area. I discovered this when optimizing a photo gallery that was taking several seconds to load hundreds of thumbnails:
// ❌ Creates all 1000 image views immediately
struct PhotoGridView: View {
    let photos: [Photo]

    var body: some View {
        ScrollView {
            VStack(spacing: 8) {
                ForEach(photos) { photo in
                    AsyncImage(url: photo.thumbnailURL) // ...
                }
            }
        }
    }
}

// ✅ Creates views only when needed
struct PhotoGridView: View {
    let photos: [Photo]

    var body: some View {
        ScrollView {
            LazyVStack(spacing: 8) {
                ForEach(photos) { photo in
                    AsyncImage(url: photo.thumbnailURL) // ...
                }
            }
        }
    }
}
The lazy version loads instantly because it only creates the first few visible image views. As users scroll, new views are created on-demand. For grids, LazyVGrid and LazyHGrid provide similar benefits with more complex layouts.
When to Use .equatable()
The .equatable() modifier [Ref-8] is a powerful but underused optimization tool. It tells SwiftUI to skip re-rendering a view if its inputs haven’t actually changed, even when parent views update. This is perfect for expensive custom views that are part of larger, frequently updated interfaces.
Consider a complex chart component that takes significant time to render. Without .equatable(), it re-renders whenever any parent state changes:
struct ExpensiveChartView: View, Equatable {
    let dataPoints: [ChartPoint]

    var body: some View {
        // Complex chart rendering logic here...
        Canvas { context, size in
            // ...
        }
    }

    static func == (lhs: ExpensiveChartView, rhs: ExpensiveChartView) -> Bool {
        // Only compare the properties that matter for rendering
        lhs.dataPoints == rhs.dataPoints
    }
}

struct DashboardView: View {
    @State private var refreshCounter = 0
    @State private var chartData: [ChartPoint] = []

    var body: some View {
        VStack {
            Button("Refresh") {
                refreshCounter += 1 // This normally triggers chart re-render
            }

            ExpensiveChartView(dataPoints: chartData)
                .equatable() // Chart only re-renders when dataPoints actually changes
        }
    }
}
By implementing Equatable and using .equatable(), the chart only re-renders when its actual inputs change, not when unrelated parent state updates. This can save significant computation time in complex interfaces.
4. How to Profile SwiftUI Performance Like a Pro
Don’t guess where performance bottlenecks exist—measure them. Xcode provides powerful profiling tools that can pinpoint exactly which views are causing problems and how often they’re updating.
Using the SwiftUI Instruments
The SwiftUI instrument in Xcode [Ref-9] is your best friend for identifying performance issues. Here’s how I use it effectively:
First, run your app with Instruments (Product → Profile). Select the “SwiftUI” instrument template. This gives you three crucial metrics: View Body counts, View Properties, and Published changes. Look for views with unexpectedly high body counts—these are your optimization targets.
When profiling, pay attention to these patterns:
- High body counts on simple views suggest unnecessary re-renders
- Cascading updates where one state change triggers many view updates
- Expensive operations happening during view updates rather than asynchronously
The SwiftUI instrument will show you exactly which state changes are causing which view updates, making it easy to identify over-broad dependencies or expensive computations.
The Classic Logging Approach
Sometimes the simplest debugging technique is the most effective. Adding strategic logging statements can instantly reveal how often views are being evaluated. Unlike print() statements that clutter console output, use a proper logging framework like OSLog [Ref-10] that can be filtered and controlled:
import OSLog

private let logger = Logger(subsystem: "com.yourapp.performance", category: "view-updates")

struct ContentView: View {
    @State private var counter = 0

    var body: some View {
        VStack {
            Text("Count: \(counter)")
            Button("Increment") { counter += 1 }
        }
        .onAppear {
            logger.info("ContentView body evaluated - Counter: \(self.counter)")
        }
    }
}
Run your app and watch the console. If you see logging messages appearing when you expect views to be stable, you’ve found a performance issue. This technique is especially useful for identifying unnecessary re-renders during animations or state changes.
The combination of strategic logging and Instruments profiling gives you complete visibility into your app’s performance characteristics. Trust me, once you start measuring, you’ll be surprised at what you discover.
Conclusion: Final Thoughts
Building performant SwiftUI apps isn’t about memorizing a list of rules—it’s about understanding how the framework thinks and designing your code accordingly. Here are the key principles I want you to remember:
- Keep view body logic simple and fast: Move expensive computations out of the body property
- Ensure stable and unique view identities in lists: Use Identifiable or stable key paths, never array indices
- Isolate state to the views that actually need it: Break down monolithic view models and pass only the data a view requires
- Profile your app with Instruments to find real bottlenecks: Don’t optimize based on assumptions; measure and prove
Performance optimization is most effective when it’s built into your development process from the start. By applying these principles consistently, you’ll create apps that feel responsive and delightful to use. Remember, users may not notice great performance, but they’ll definitely notice when it’s missing.
SwiftUI gives us incredible power to create beautiful, interactive interfaces quickly. With these performance techniques in your toolkit, you can ensure that beauty doesn’t come at the cost of responsiveness. Now go build something amazing—and make it fast.
References
- [Ref-1] Apple Developer Documentation – State and Data Flow
- [Ref-2] Apple Developer Documentation – @State
- [Ref-3] Apple Developer Documentation – @ObservedObject
- [Ref-4] Wikipedia – Dependency inversion principle
- [Ref-5] Apple Developer Documentation – ForEach
- [Ref-6] Apple Developer Documentation – Identifiable
- [Ref-7] Apple Developer Documentation – LazyVStack
- [Ref-8] Apple Developer Documentation – equatable()
- [Ref-9] Apple Developer Documentation – Diagnosing performance issues with the SwiftUI Instruments
- [Ref-10] Apple Developer Documentation – OSLog
